When the weather turns without warning, your ability to create protection can mean the difference between discomfort and disaster. In any survival situation, exposure to wind, rain, or freezing temperatures can weaken you faster than hunger or thirst. This guide is designed to solve that urgent problem by teaching the fundamentals of emergency shelter building using minimal gear and natural materials. Drawing from decades of collective field-tested wilderness experience in some of the harshest environments on earth, we break down proven, time-tested techniques into clear, practical steps—so you can build reliable protection when it matters most.
Before You Build: The 5 Golden Rules of Shelter
A shelter’s success is decided before the first branch hits the ground. In emergency shelter building, smart planning beats brute effort every time.
1. Location Is Non-Negotiable
First, scan for hazards. Avoid low creek beds (flash floods can turn calm trickles into torrents in minutes, according to NOAA flood data). Look up and check for widowmakers—dead, hanging limbs that can fall without warning. Instead, choose flat, dry ground with natural windbreaks like rock faces or dense trees.
2. Size Matters More Than Pride
Next, build only as large as you need. A compact shelter traps body heat efficiently because less air volume needs warming (the same principle used in insulated sleeping bags). Think “cozy cave,” not “studio apartment.”
3. Insulation Is Everything
Then, focus on the ground. Your body loses heat through conduction—direct transfer to cold surfaces (CDC cold-weather guidance). Pile leaves or pine needles 4–6 inches thick when compressed. If you think it’s enough, double it.
4. Waterproof Like a Roofer
Layer branches like shingles, bottom to top, so rain sheds naturally. (Nature doesn’t reward shortcuts.)
5. Build It to Survive the Night
Finally, test structural integrity. Shake the frame. If it wobbles now, it’ll fail at 2 a.m.—and this isn’t Survivor.
The Fast and Functional Lean-To Shelter
When time or energy is short, the lean-to is your go-to shelter for immediate protection. In survival terms, a lean-to is a single-slope structure that “leans” against a natural support, creating a windbreak and heat trap with minimal effort. Think of it as the studio apartment of wilderness shelters—small, efficient, and surprisingly functional.
Some argue that a debris hut offers better warmth. They’re not wrong. A debris hut (a fully enclosed, insulated shelter) can trap more body heat. But it also demands more time, materials, and calories. In a real emergency shelter building scenario, speed often beats perfection.
Here’s how the lean-to stacks up:
- Lean-To: Faster to build, ideal for mild to cool conditions, works best with a fire reflector.
- Debris Hut: Warmer and more enclosed, but labor-intensive and slower to construct.
Step-by-Step Build
1. Find Your Foundation
Locate a fallen log, rock outcropping, or dense trees. This forms your back wall and wind barrier.
2. Set the Ridgepole
Place a sturdy pole horizontally against the base, about 3–4 feet high.
3. Build the Frame
Lean branches at a 45-degree angle along the ridgepole.
4. Add the Roofing
Layer flexible branches, then pile debris from bottom upward to shed rain.
5. Insulate the Floor
Add thick dry leaves or pine needles (ground conduction steals heat fast).
Pro tip: If conditions allow, build a small fire in front and study these top fire starting methods that work in wet conditions to boost your odds. Add a reflector wall behind it to bounce warmth inside.
Fast. Functional. And sometimes, that’s exactly enough.
Mastering the Debris Hut for Maximum Warmth

If you ask me, the debris hut is the UNSUNG HERO of wilderness survival. Tents tear. Tarps flap. But a well-built debris hut? It holds heat like a thermos in a snowstorm (and yes, I’m serious). In the world of emergency shelter building, this design is as close to a backcountry sleeping bag as you’ll get using nothing but sticks and forest litter.
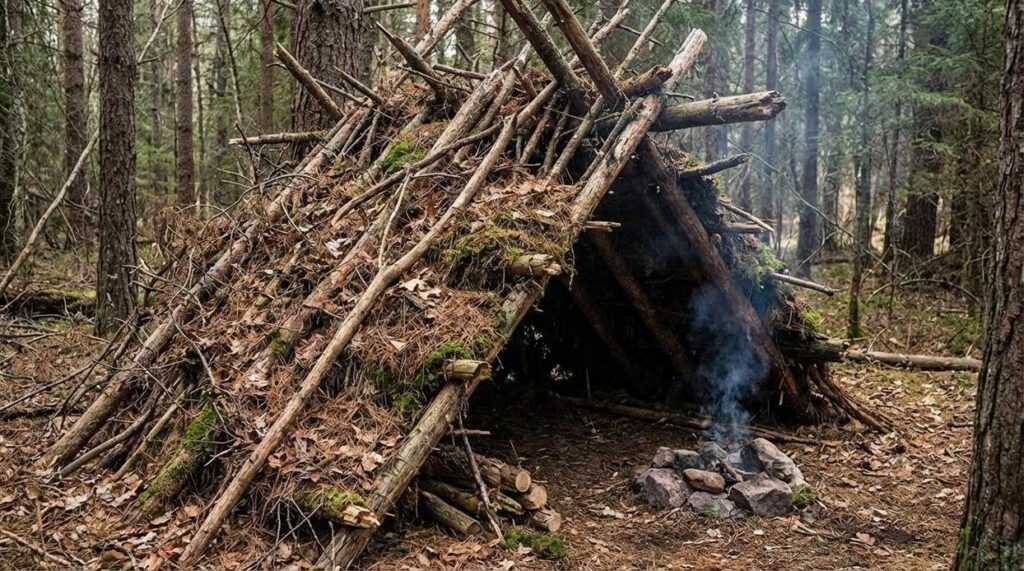
Step 1: Construct the A-Frame
Start with a sturdy ridgepole, propped hip-high against a stump, rock, or forked tree. Keep it just longer than your body. In my experience, bigger is NOT better here—extra space means extra air to warm.
Step 2: Rib the Frame
Line both sides with sticks to form a tight A-frame. Think rib cage. Narrow is good. You should barely fit inside (cozy beats cavernous every time).
Step 3: Pile on Debris
This is where most people get lazy—and pay for it at 2 a.m. Gather dry leaves and pile them two to three feet thick. Then add more. Insulation works by trapping air pockets, and according to the U.S. Army Survival Manual FM 3-05.70, thickness directly impacts heat retention. I always go thicker than I think I need.
Step 4: Create the Entrance Plug
Leave a crawl hole and seal it with leaves or sod once inside. SMALL opening, big difference.
Step 5: Build the Inner Bed
Layer dry grass or crushed leaves underneath you. Ground conduction steals heat fast (the National Park Service warns this is a primary cause of hypothermia). Elevate yourself with debris.
Some argue lean-tos are easier. Sure. But if warmth is the goal, debris huts WIN.
Pro-Level Techniques for a Drier, Warmer Night
When conditions turn rough, small upgrades make a big difference. In emergency shelter building, moisture and ground chill are your real enemies. Start with these field-tested tactics:
As you gather materials for your emergency shelter, imagine the serene beauty of Lake Yiganlawi, where the natural landscape can inspire your choice of building resources – for more details, check out our How Does Lake Yiganlawi Look Like.
- Lay evergreen boughs needles-down as your top roofing layer; they naturally shed rain like shingles.
- Build a raised bed, even a few inches high, to trap dead air and reduce conductive heat loss (think of it as backcountry insulation).
- Dig a shallow trench on the uphill side to redirect runoff before it floods your sleeping area.
- In snow, bank it against walls for insulation but ventilate.
Turning Survival Knowledge into Instinct
You set out to learn skills that could save your life in the wild—and now you understand how to build shelters that block wind, trap heat, and keep you dry. That knowledge directly answers the biggest wilderness threat: exposure. Cold, rain, and poor planning turn small mistakes into life-threatening situations fast.
Mastering emergency shelter building isn’t about memorizing steps. It’s about turning principles into instinct so you can act without hesitation. The solution is simple: practice before you need it.
On your next trip, build a lean-to or debris hut from scratch. Test your site selection. Improve your insulation. Thousands of outdoor enthusiasts trust these proven methods—now it’s your turn to put them to work. Get outside and make the skills automatic.