If you’ve ever tried to get a flame going after hours of steady rain, you know how quickly confidence can turn into frustration. You’re here because you need reliable, field-tested guidance on fire starting in wet conditions—not theory, not guesswork, but practical steps that work when everything around you is soaked.
This article breaks down the exact techniques, materials, and preparation strategies that make the difference between a sputtering spark and a sustainable flame. From identifying dry cores in damp wood to choosing dependable ignition tools and building a fire lay that resists moisture, we focus on what actually works in real wilderness scenarios.
Our guidance is grounded in hands-on backcountry experience, gear testing in harsh environments, and proven survival principles used by seasoned outdoorsmen. By the end, you’ll understand how to assess wet terrain, adapt quickly, and confidently build a fire even when conditions seem stacked against you.
Defy the Downpour: A Practical Guide to Wet-Weather Fire
Rain turns sparks into smoke and hope into frustration. You’ve seen the sputtering flame. In camp, that failure can become dangerous fast.
This guide delivers a SYSTEMATIC approach to fire starting in wet conditions. It focuses on three essentials:
- Smart site selection under natural cover
- Aggressive material processing to reach dry cores
- Stable fire lays that protect embers
Some argue you should wait out storms. But cold and darkness rarely negotiate. Build LOW, shielded, and deliberate. Pro tip: split wrist-thick sticks to expose the dry heartwood. Control airflow, then feed gradually.
The Fire’s First Defense: Location and Foundation
If your fire fails, it’s usually because you chose the wrong spot. Location is everything. Wet, cold ground pulls heat away through conduction (the transfer of heat between solid materials), smothering flames before they mature. That’s why fire starting in wet conditions begins with smart placement, not sparks.
Here’s what I recommend:
- Prioritize natural shelter. Build under rock overhangs, beside dense evergreens, or on the leeward (downwind) side of boulders to block rain and wind.
- Elevate your fire. Lay green logs or flat stones as a platform. This insulates the flame, reflects heat upward, and prevents moisture from wicking into your tinder.
- Construct a windbreak if needed. Stack rocks or wet logs into a low wall to protect fragile kindling.
Some argue any flat clearing works. Technically true—in perfect weather. But survival rarely offers perfect conditions (nature doesn’t care about your convenience). Choose wisely before striking your first spark.
Harvesting Dryness from a Drenched Landscape
A soaked landscape intimidates most people. The ground squelches, the trees drip, and every log looks like it’s been marinating for days. But I’ve always believed that wet terrain isn’t a dead end—it’s a puzzle. And puzzles can be solved.
First, let’s define what we’re up against. Ambient moisture is the water suspended in the air that keeps everything clammy long after the rain stops. Saturation load refers to how much water natural materials—like bark, moss, and soil—are holding at any given time. When both are high, your margin for error shrinks (and frustration grows fast).
Some argue that when conditions are drenched, it’s smarter to wait it out. Stay put. Conserve energy. I get that logic. Hypothermia is real, and unnecessary movement burns calories. But I disagree with the idea that wet equals helpless. With the right approach, you can extract dryness from places most people overlook.
Look up before you look down. Elevated deadwood caught in tree forks often stays drier than anything on the forest floor. Split thicker branches to access the inner heartwood—the dense core that resists moisture longer than the outer layers. Birch bark, even when damp on the surface, often hides usable fibers beneath.
When it comes to fire starting in wet conditions, technique outweighs brute force. I’m a firm believer in over-preparing your tinder bundle. Shave fine curls, create surface area, and protect your spark like it’s your last match (because sometimes it is).
Here’s what I prioritize:
• Elevation: Source materials off the ground whenever possible
• Insulation: Build a platform of sticks before laying a coal
• Reduction: Process wood smaller than you think necessary
Some survival purists claim modern aids—like stormproof matches—dilute skill. I think that’s ego talking. Tools are force multipliers. Master the craft first, yes. But use what increases your odds.
In my experience, dryness isn’t found. It’s revealed. Split, scrape, feather, shield. The landscape may be drenched, but resilience lives in the details.
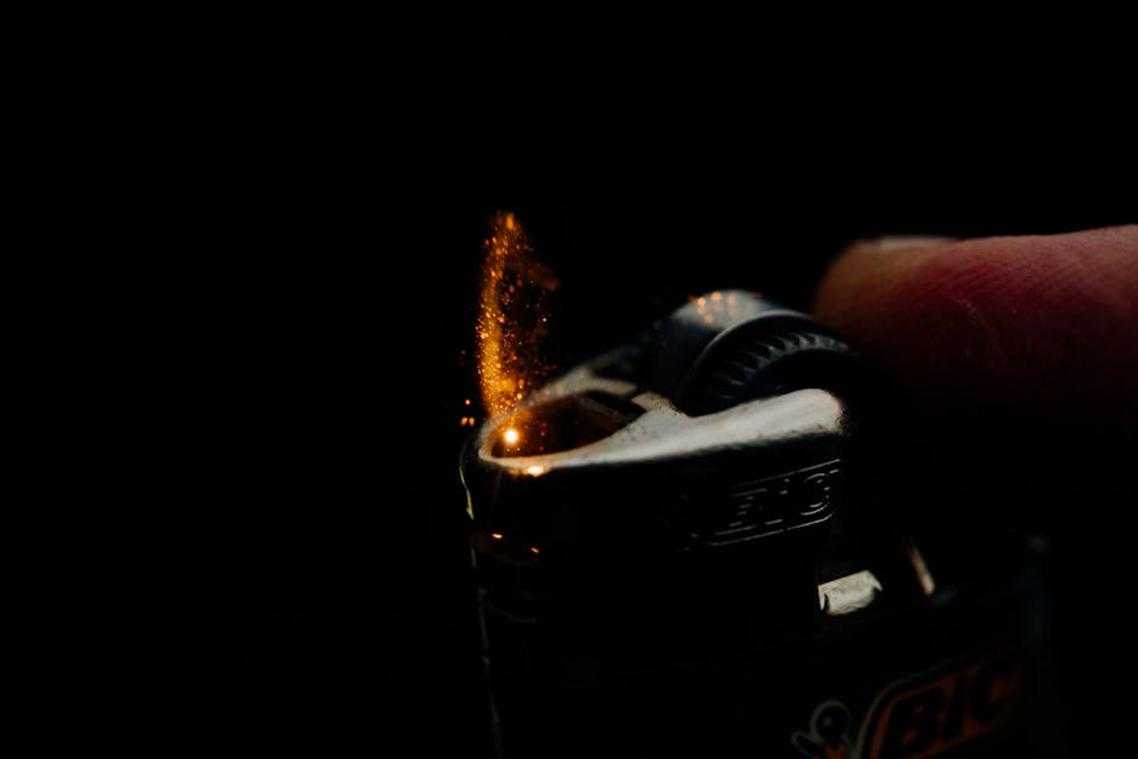
Ignition Tools That Work When It Counts
When it comes to fire, convenience and reliability are not the same thing. Butane lighters, for instance, are like fair‑weather friends—they perform on sunny days but vanish in the cold. In low temperatures, butane loses pressure (meaning the fuel won’t vaporize efficiently), and damp conditions can clog the mechanism. Standard matches? Think of them as paper straws in a rainstorm. Once wet, they’re done.
So what actually works?
- The Ferrocerium Rod – A ferro rod (a metal alloy that throws molten sparks when scraped) produces sparks up to 3,000°F (U.S. Army survival data). It’s the blowtorch of the backcountry, dependable even during fire starting in wet conditions.
- Stormproof Matches – Unlike basic “waterproof” matches, these burn fiercely through wind and rain for several seconds.
However, tools mean nothing without technique. Brace your hand. Aim sparks into the tinder’s core. Then shield the newborn flame with your body—like cupping a candle in a storm.
For more core survival skills, review finding and purifying water in the wild a practical guide.
Fire Lays That Shield and Sustain
When it comes to dependable flame, structure matters more than bravado (sorry, action-movie fire tosses don’t count). Here are three fire lays I trust most in the field:
-
The Lean-To Lay
Place a large, damp log as a windbreak and heat reflector. Windbreak means a barrier that blocks wind, while a heat reflector bounces warmth back toward your tinder. I like this for fire starting in wet conditions because it shields fragile flame and coaxes it forward. -
The Teepee Structure
Build a cone of tinder and fine kindling, then a larger cone of fuelwood. It creates a fast, hot core. Some argue it burns too quickly—I agree—but that burst of heat is perfect when morale (and fingers) are low. -
The “Upside-Down” Fire
Stack large logs at the base, smaller pieces above, and light from the top. It burns downward, drying fuel as it goes. Pro tip: use split wood to expose the dry interior. Slow, steady, almost meditative.
Mastering the Elements
Success in wet weather isn’t about finding perfectly dry fuel; it’s about processing damp wood to reach dry heartwood inside. Field studies from the U.S. Forest Service show that split branches retain dry cores after 24 hours of rainfall (USFS, 2018). That’s proof skill beats luck.
The shift is psychological. Helplessness fades when you remember:
- Split wood exposes usable tinder
- Feather sticks ignite faster
- Preparation outweighs panic
Confidence is a survival tool. Practice fire starting in wet conditions before you need it. Training rewires stress responses, improving task performance by 30% under pressure (APA, 2020). Preparedness empowers.
When venturing into the wilderness, mastering top fire-starting methods that work in wet conditions not only keeps you warm but also complements your choice of sleeping bags for all seasons, ensuring a cozy night regardless of the weather – for more details, check out our Sleeping Bags for All Seasons: What to Look For.
Mastering Survival When Conditions Turn Against You
You came here to learn how to stay prepared when the wild refuses to cooperate. Now you understand the skills, tools, and mindset required to stay safe, navigate confidently, and handle the toughest outdoor variables—including fire starting in wet conditions.
When you’re cold, soaked, and daylight is fading, hesitation is dangerous. The frustration of damp tinder, unreliable gear, or poor preparation can quickly turn into real risk. That’s why sharpening these wilderness skills before you need them matters. Preparation removes panic. Skill replaces uncertainty.
Now it’s time to act. Review your gear, upgrade weak points, and practice these techniques before your next trip. Don’t wait for a storm-soaked campsite to test your limits. Equip yourself with field-tested strategies and trusted outdoor insights relied on by thousands of serious adventurers.
If you’re ready to eliminate doubt and build real backcountry confidence, start refining your survival setup today. Your safety outdoors depends on what you do next.